I Made Bob Clarke’s 1966 MAD Mobile (So You Won’t Have To)
Part 1: Preparations, Cutting, and Threading
Part 2 is here; and fancy gifs are here.
NOTE: Click thumbnail for a small version of photo. Click again for full size.
After constructing the MAD zeppelin, designed by Bob Clarke for the 1965 “The Worst From MAD,” almost two years ago, I had already decided that I was going to build Clarke’s 1966 MAD mobile next. I bought a copy of the MAD Follies Number 4 right after buying the Worst From and made the mobile’s color photocopies at the same time I copied the zeppelin insert. The zeppelin proved to be a fun and moderately difficult project, with the major flaw being the thin paper stock I used. The most difficult step was the threading/rigging of the two main parts.
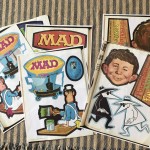
With copies in hand, I sat on the assembly for months, mostly fretting over the situation with the paper. Unlike the zeppelin, the mobile is two sided, and Clarke had only put the “cut here” hashed line on one side of the insert. Cutting two parts of each piece, gluing them together, and then threading them on the straws just didn’t sit well with me. After the delay, I finally bought a low-grade copy of the MAD Follies that still had an intact mobile. I had decided to cut out the original inserts in this yellowing, well-read and folded-in copy and make the mobile with old paper, not my color copies.
One interesting pre-step of the mobile assembly was that I needed to find straws. I didn’t want to buy them since I don’t need more than the six that Clarke’s instructions call for. Freely available everywhere, they were not hard to find (even in the oceans). After my first run to Popeyes down the street, I realized that Clarke’s design called for “king size” 10-inch straws. The Popeye’s straws were compostable, and only 8 inches long. Luckily, I found 10-inch straws at a Starbucks. That was easy!
OK. Time to make this classic MAD special.

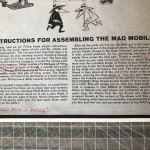
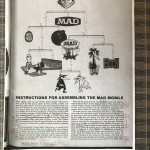


CLARKE’S INSTRUCTIONS
I’m a bullet point guy, so Clarke’s instructions – laid out in one long paragraph – didn’t work for me. I wrote numbers for the steps, underlined what supplies I needed, and made a few interesting discoveries. First, I am much better at cutting with a blade, so I opted for an X-Acto knife instead of a big pair of scissors. I did need small scissors later in order to cut the threads. Using a blade also meant that I would need a cutting mat. (See photos in album below.)
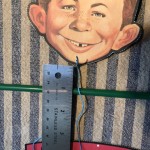
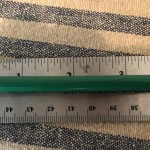
If you look at the design that Clarke’s supplies, you will see that the straws and threads are all measured. Somehow Clarke left out the fact that a ruler was needed to assemble this mobile. I have a metal one I use all the time, so finding one wasn’t a problem. Since all the instructions point the young 1960s MAD reader to his mother’s sewing kit, I guess a tape measure would work just as good.
Second, there are two very important tips in the instructions: do not puncture the tied off parts in the middle of the straws, and – this one needed a magnifying glass to read – the punctured ends of the straw are 1/8 an inch from the edge. That’s all you need to know to get started.
ASSEMBLY WAS MOSTLY EASY
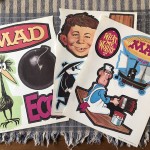
I tried to tear out the first inserted page and the 50+ year old paper was dry and tore in a way that could have destroyed the mobile parts. I used a blade to cut the rest. Clarke’s hashed lines made the cutting easy. Cutting the straws was easy, but my compostable straws didn’t cut as well as the plastic. These steps were all quite easy compared to the zeppelin assembly.
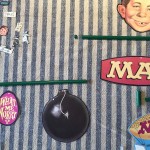
Then, I followed the instructions and measured out the straws and parts while they were laid flat on a table. I used Clarke’s illustration to place the parts flat on my table, much like the mobile on the MAD Follies cover.
Next step(s): time to thread it. Other than measurements and Clarke’s “thread either free or punctured” rule, there are ZERO instructions about how to tie off the parts. Like stringing his zeppelin, this proved to be the hardest part.
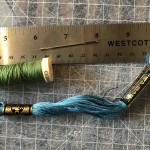
First, what kind of thread should I use? I had single-strand and a thicker type from my sewing basket. I was lucky to have a needle with a large eye, so I choose the thicker thread. It caused some problems with making the knots, but was easy to wet the ends and thread it through the needle.
As for threading method, I ended up pulling a long piece of thread through the mobile part and tying the very end of the thread to the part while keeping the needle in the other end. Then I stuck the needle through the straw and pulled the string through. This method worked for most of the pieces, but the “middle” parts (Alfred’s head, the MAD logo, below the zeppelin) as well as the thread in the middle of the straws didn’t work this way.
I made a list of steps for what I think is the best way to thread (most of the time): 1) thread needle; 2) put through mobile piece; 3) pull through and tie off bottom end; 4) measure from straw; 5) hold with fingers, use needle to tie off; and 6) trim ends.
Threading the mobile was easy, except for getting the measurements to be exact. It was very hard to tie off a piece at exactly one inch. Or six inches. I had to re-do a few parts after the final measure came up too long or short. This took some patience, which made me wonder if the children in 1966 actually had the patience to get it all right. In the end, I will say that the measures were very close to what Clarke wanted. Fingers crossed that the mobile will still balance.


5 Replies to “Making the MAD Magazine Mobile”
Comments are closed.